

Diamond painting is comparable to painting by quantity, except that instead of using paint, you're using miniature, flat-backed rhinestones, crystals, or diamonds. It's possible to purchase diamond painting kits online and in certain well-stocked arts and crafts stores.
The process may seem intimidating, but it is actually rather easy. Once you understand what to do, then it is possible to get the undertaking both rewarding and relaxing.
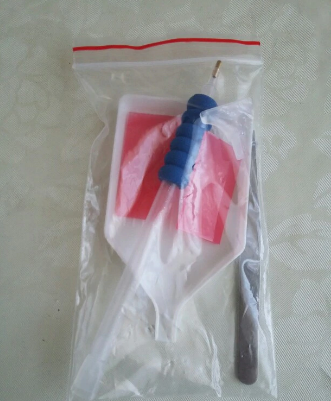
It is possible to find these online although a number of craft stores may also carry them. Each manufacturer will be a little different, however, most kits may include the following: some pre-printed canvas, flat-backed diamonds, and a tray, a pen-like instrument, and a packet of wax or gel. .
The canvas is composed of little boxes that are painted and painted with numbers, much like a cross-stitch canvas. Each level corresponds to a diamond color. The numbers are all written on a chart, together with all the corresponding tote and diamond color written under or alongside it. The graph is usually printed on the face of the picture.
Some squares might have a letter or logo instead; treat this as a number. If the canvas won't put flat, roll down it the other way, then unroll it. Spread it down on a level surface, then secure the edges with masking tape.
This project can be time consuming. Think about taping the canvas to a plank, which you'll be able to move from the way readily. Do not peel all the plastic away; 1 to 2 inches(2.54 to 5.08 centimeters) would probably be plenty. Run your own fingernail over the plastic to crease it so that it will not roll forwards.
Some kits come with pre-cut plastic pieces. In this case, simply peel the very first strip off. Take a peek at the patch of picture you exposed. Select a box to begin with, and see that the amount in it. Look the number up on the graph, then discover the bag with the same number. Open up the bag, and then pour out a few of the crystals on the tray which came with the kit.
Some kits include numerous trays. You can use the other trays to the other colors in that section.
Part2
Applying the Diamonds
1
Scrub your pencil tool to the wax or gel that came with your kit. Open the packet of gel that came with the kit. Dip the narrow end of the pen into the gel/wax to pick a few up. This will make it easy for the pencil to select up the crystals.
Some kits include a unique wax pencil which you need to sharpen rather. In cases like this, sharpen the pen by means of a pencil sharpener.
Some pens will have a broad end also, which you may use to pick up to three crystals at one time. Gently press the tip of the pen against the surface, faceted region of the crystal. Lift the pen away from your tray; then the crystal should be stuck into it.
Maintain the tray just below the edge of your canvas; this is going to make it a lot much easier to get.
Pull away the pencil; the crystal ought to be stuck from the canvas. If you're only beginning, it may be a great idea to press lightly at first. In this manner, if the crystal is off-set, you can nudge it into place, then press it to fix it.
This is precisely like painting by quantity, but that you are using crystals instead. Work one color at one time and wash the pencil gel as needed. After you finish filling in most of the squares with the identical number code, then move onto another color. This will help you work faster and remain organized.
Avoid resting your hands against the canvas; the more you touch the sticky surface, the less tacky it will turn into. Continue filling the picture in utilizing the same method as before. Function in 1 to 2-inch (2.54 to 5.08-centimeter) wide segments, one color at a time. When you fill in a segment, proceed onto the next one.
Don't peel off the entire plastic covering away, or even the glue on the canvas will probably become filthy and lose its glow.
Part3
Finishing Your Work
1
Cover the canvas using the vinyl sheet which it came together. If you lost the sheet, you can pay for it with a sheet of paper or parchment paper; avoid using wax paper.
Two
Go over the canvas with a rolling pin. This may press any loose diamonds and secure them. [7] If you don't have a rolling pin, then you can use a jar or can instead. You can also lightly rub the canvas with your hands rather.
Stack some heavy books on top of the picture instantly.
This can help further adhere the diamonds into the canvas and ensure that they bond properly. If you don't have any publications large enough to pay for the canvas, then you can use a second flat, heavy object, like a cutting or box board. Lift off the books first, then peel off the plastic covering off. Peel the tape from the corners of the picture. Do not trim the extra canvas way, because this might cause the cloth to fray.
5
Length the canvas. Remove the glass from the frame first, then insert the canvas to the framework. Fold the excess edges down, then set the backing right into place.
Leave the glass out, as it will just pull down the diamonds' sparkle.
For a fancier signature, place the canvas supporting a mat first; this will provide the canvas an additional border within the frame. Pick a color that complements the diamonds.
You should delete all of this text and replace it with the text of your own. You can modify any text on your page with the Text formatting tools at the top of the page. To add other content, use the Media and Add-ons tabs. If you'd like to change your style template click on Styles. To add or remove pages use the Pages tab.